As of the Summer 2025 term, Course Rosters and Wait Lists will be accessed in Vergil. Wait Lists from Spring 2025 and prior will be archived in SSOL. You will be able to see Students on historic rosters in Vergil.
Link to access your Wait Lists and Class Roster - https://vergil.columbia.edu/admin-administration/class-roster
Below is information about accessing Rosters and Wait Lists in Vergil and all of the available features and settings.
Navigating to Class Rosters and Wait Lists
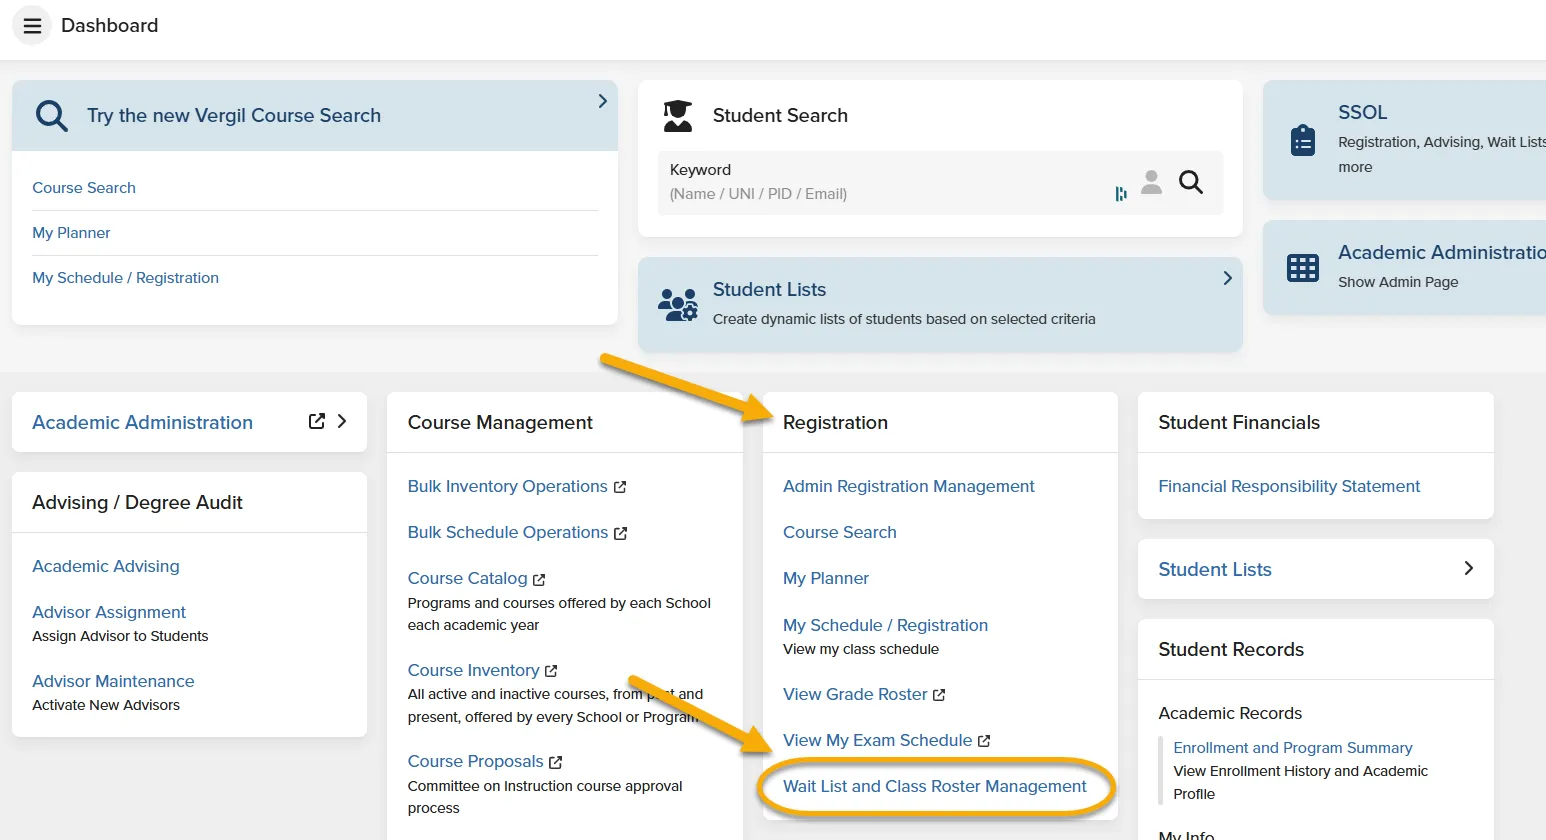
From the Vergil Dashboard, locate the Registration tile and click on the Wait List and Class Roster Management link. If you do not see the link on your dashboard, request access through the online access form - Request - Columbia University Service Portal.
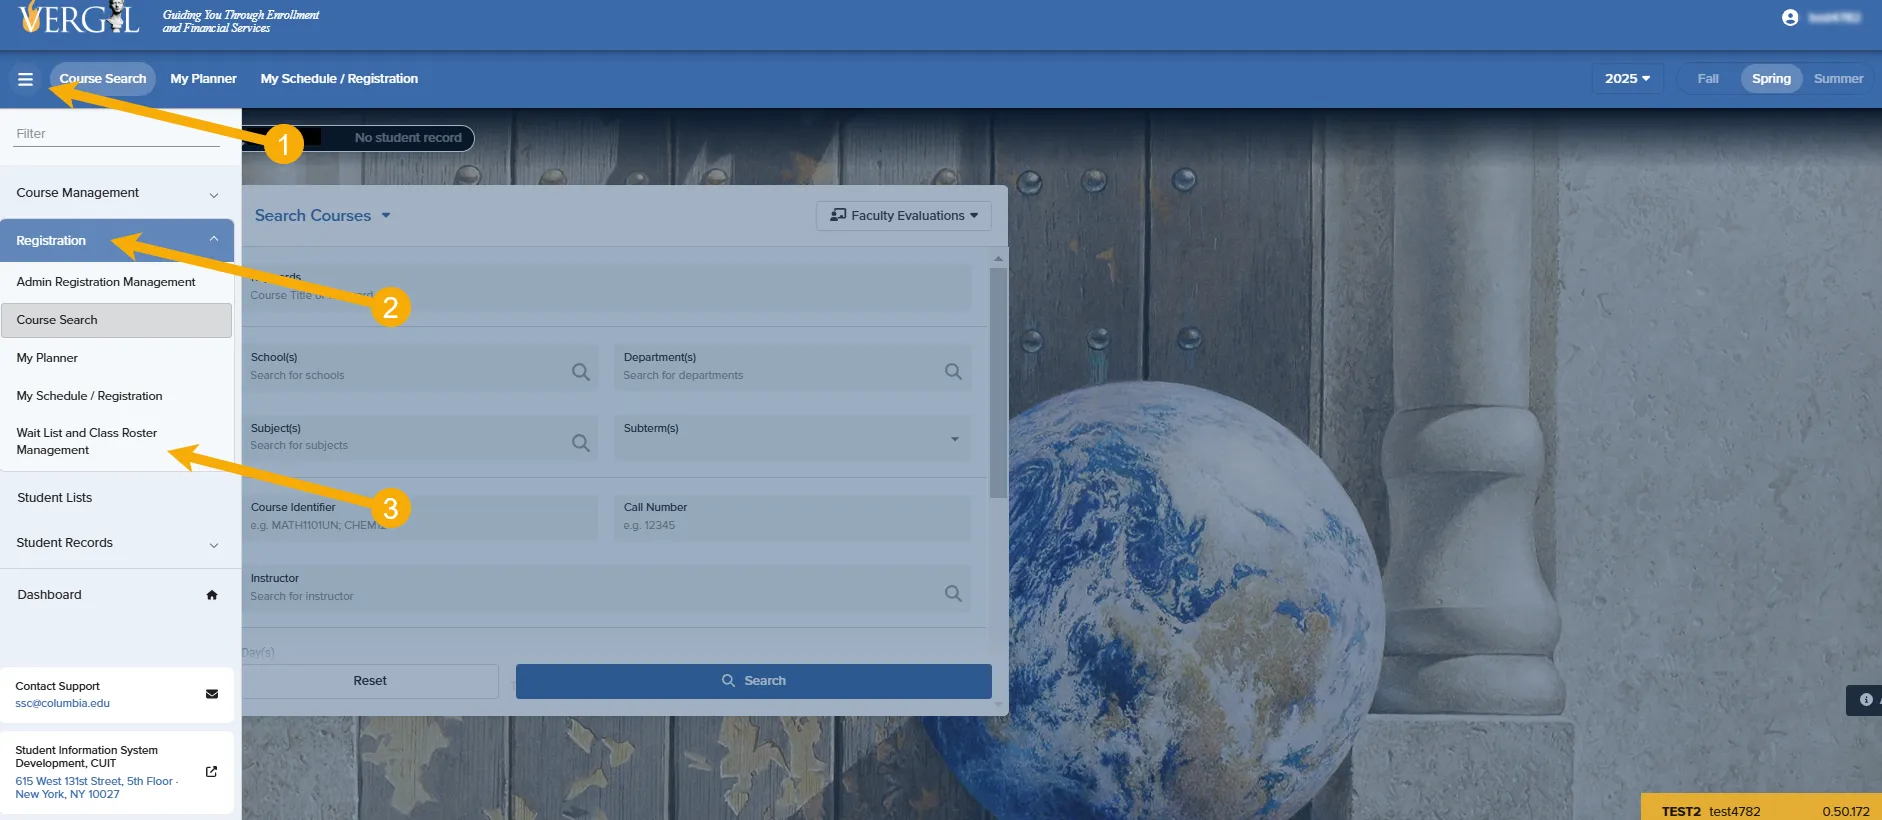
From within any page in Vergil, open the left-hand navigation panel. Click on Registration to expand the list then click on the Wait List and Class Roster Management link. If you do not see the link on your dashboard, request access through the online access form - Request - Columbia University Service Portal.
Course Rosters - Features and Functionality
Access to Class Rosters (and Wait Lists) is based on permissions.
- Class Administrators will have access to see Rosters and Wait Lists based on access assigned in Course Management.
- Course Instructors will have access to only Courses they are assigned a faculty role.
- Additional access to Class Rosters can be assigned as needed. Please complete the Vergil access form if you do not see the Course Rosters you should - Request - Columbia University Service Portal
You will only see and be able to find Courses you have access to based on your permissions (see above).
Courses will be first filtered by Year and Semester (2). Fine tune the Roster results using Keyword Search (1), Instructor, Subterm (3). Open the Roster or Wait List from within the list (4).
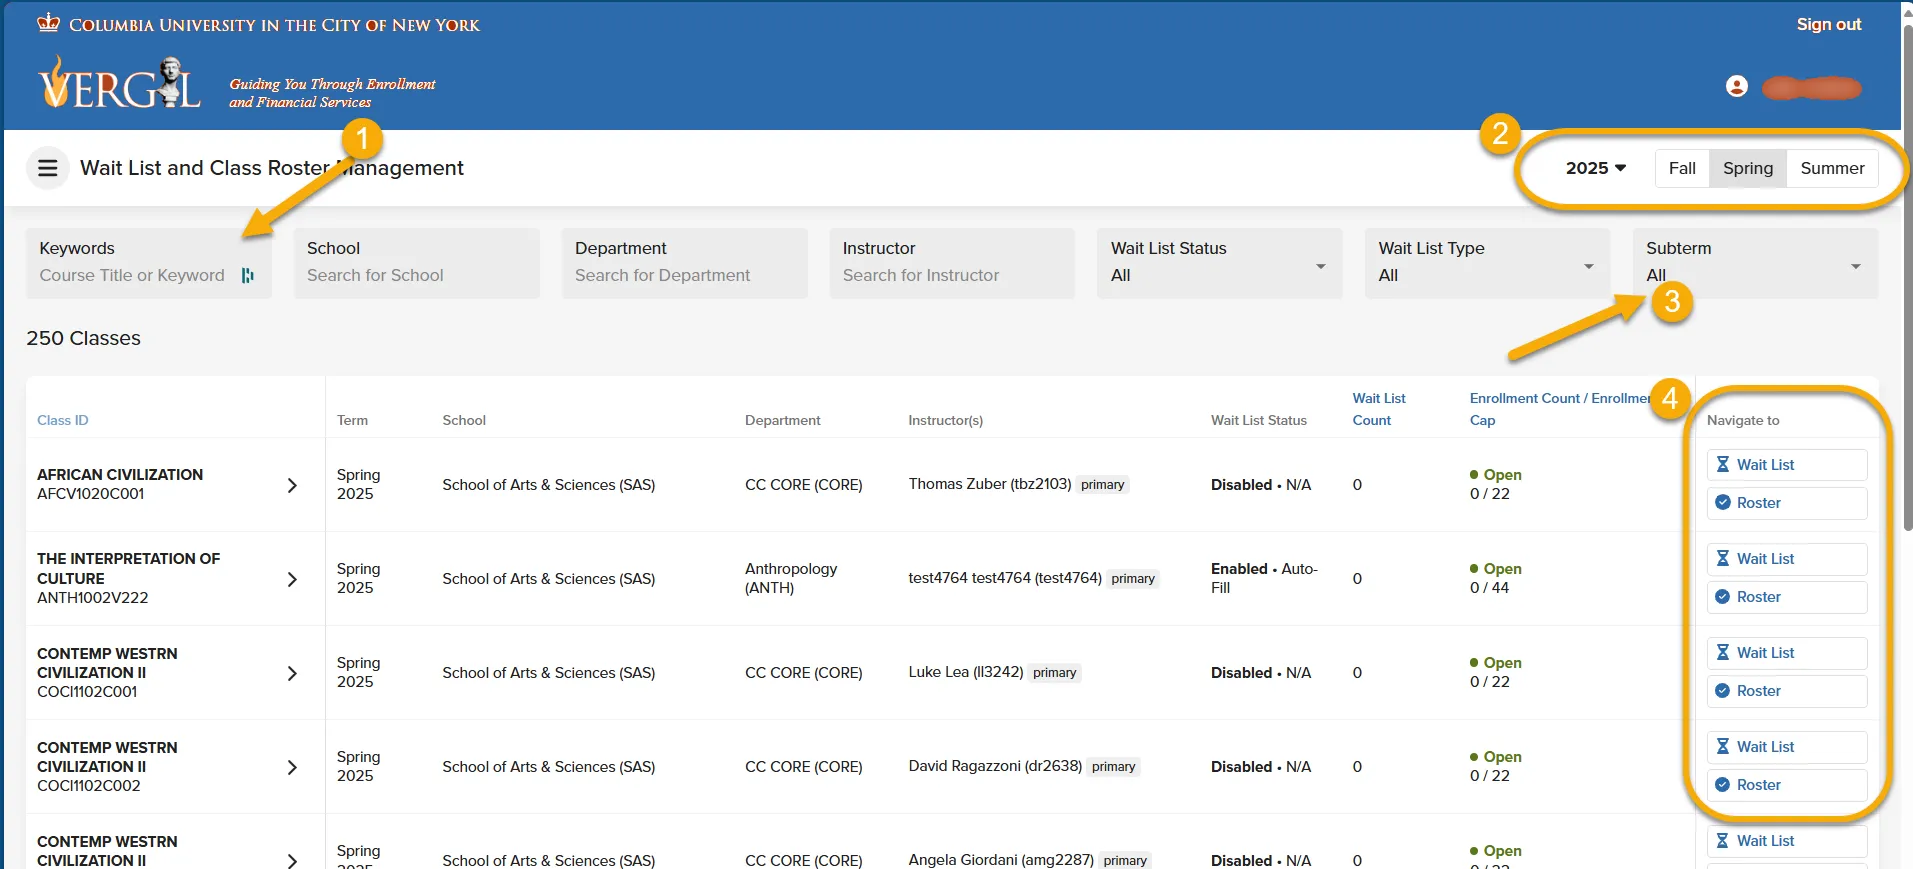
- Once you open a Roster or Wait List, you can easily toggle between the two.
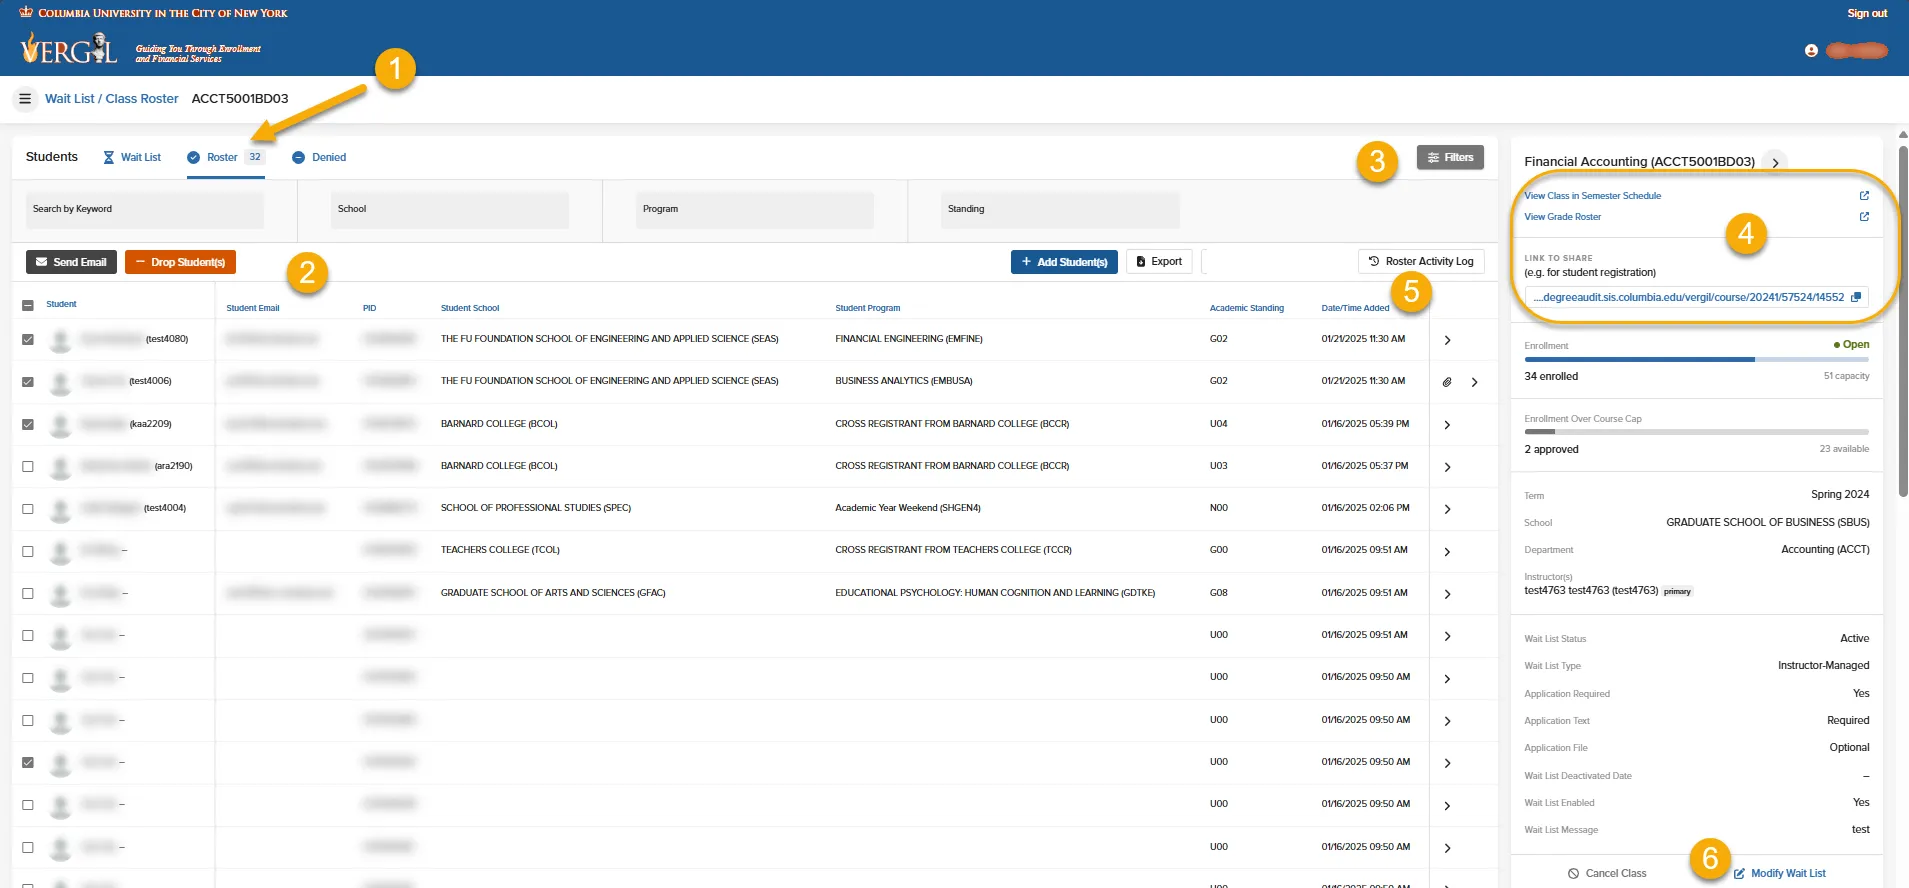
- From within the Roster, you will see the list of Students who are registered for the course, along with their contact information, School, Standing, and Program.
- Filter the list of students on the Roster (same setting on Wait List) by School, Program, or Standing.
- Find links to take you to the Class Schedule Page (Course Management), Grading Roster (in SSOL), and a shareable link to Vergil Course Search for Student Registration.
- See the Day/Time a student joined the Roster
- View current and Manage Wait List Settings
Rosters easily facilitate correspondence with students. You can select one or more Students on Rosters (and Wait Lists) to send an email.
- Select Student(s)
- Click “Send Email to all xx students” which will launch a pop up with options.
- Selecting "Send email" will launch your default email application, and place students in the BCC line
- Selecting "Copy email addresses to clipboard" will allow you to paste all student email addresses into an email. IMPORTANT: Paste student emails into the BCC Field and be sure to use your Columbia email account.
Note: please click on the reference image below to expand and view all available options.

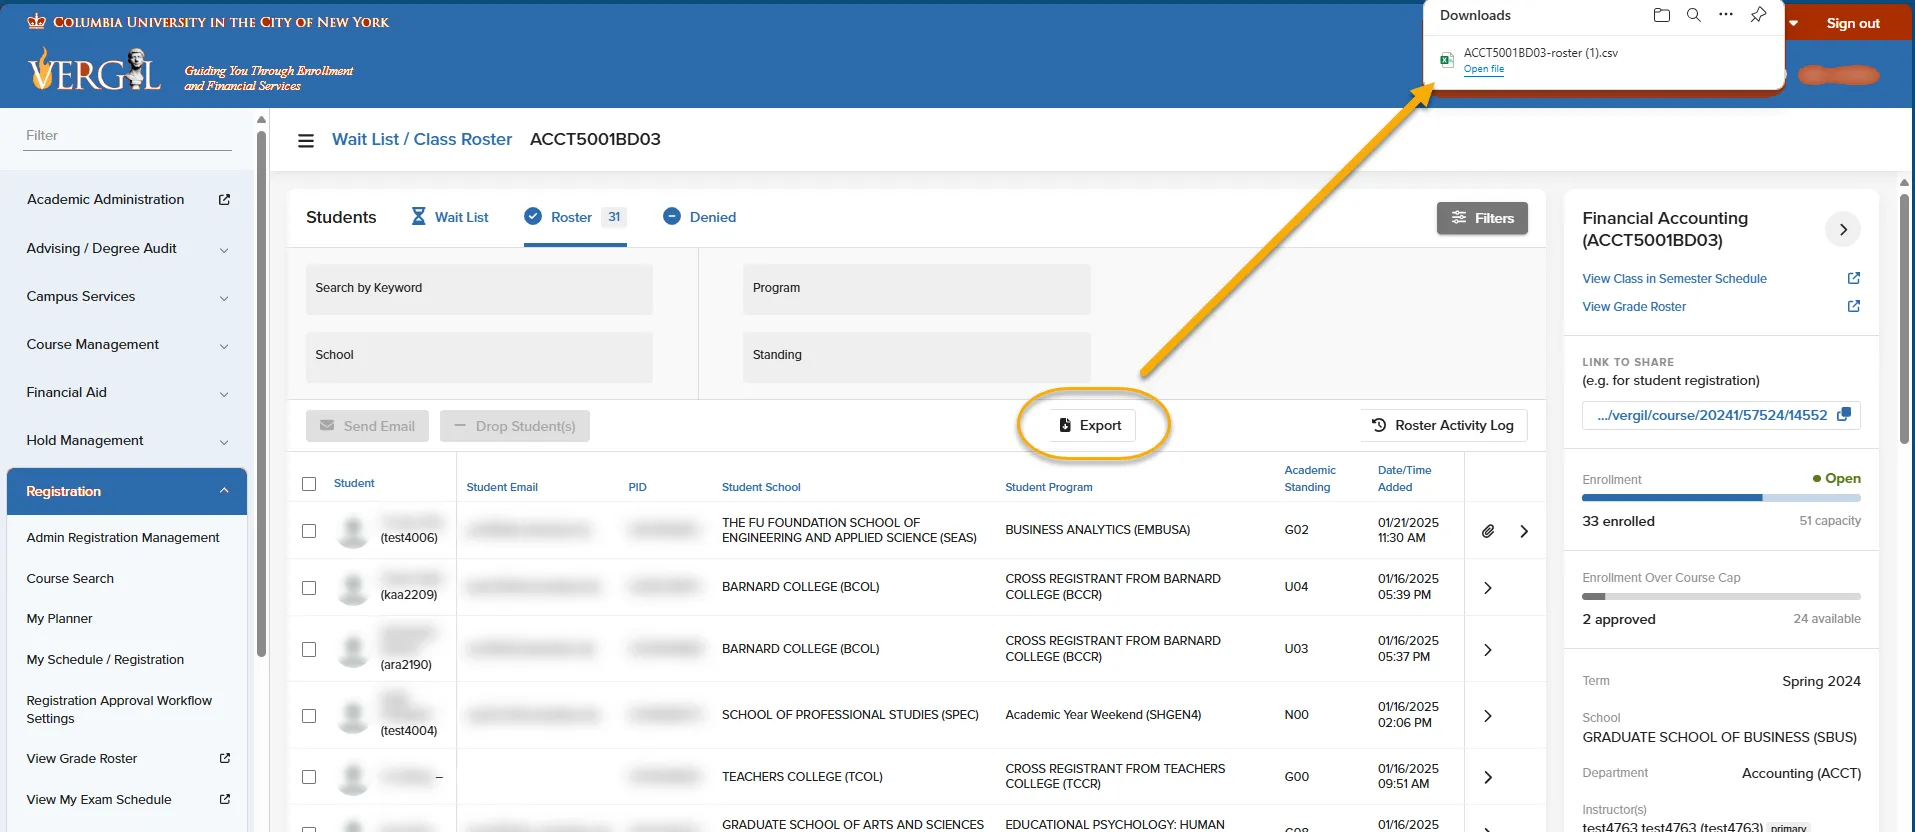
The Export function on Rosters (and Wait Lists) allows you to download a .CSV file of students currently on the Roster (or Wait List). The .CSV will include the visible columns on the Roster (or Wait List).
Each Registration transaction is recorded in a log. The log captures the data points below and can be filtered by Course, Action, etc.
Columns can be customized for view and/or export by clicking 'Manage Columns.'

Managing Course Wait Lists
Initial Wait List Settings are determined when the Schedule is activated in Course Management and can be modified in either Course Management or from the Course Roster.
Information about the Wait List Settings is detailed in the Schedule Fields page - https://sishelp.sis.columbia.edu/content/fields-semester-schedule#cu_accordion_item-1541
Note: some Schools/Programs opt to disable Wait Lists for all Courses, and you will not see these fields if this is the case.

When a Wait List is set to "Auto-Fill," Students can register in the Course up until the enrollment capacity is reached. After this point, they will be added to the Wait List and registered automatically in the Course as seats become available. Students will see their position number in Vergil Planner and Schedule.
Instructor-Managed Wait Lists require that all students first join the Wait List. The Instructor or a Class Administrator must review each student and manually approve (or deny) a student's registration into the course. If a Wait List is set to Instructor-Managed, there are options to require that student submit additional "application" material.
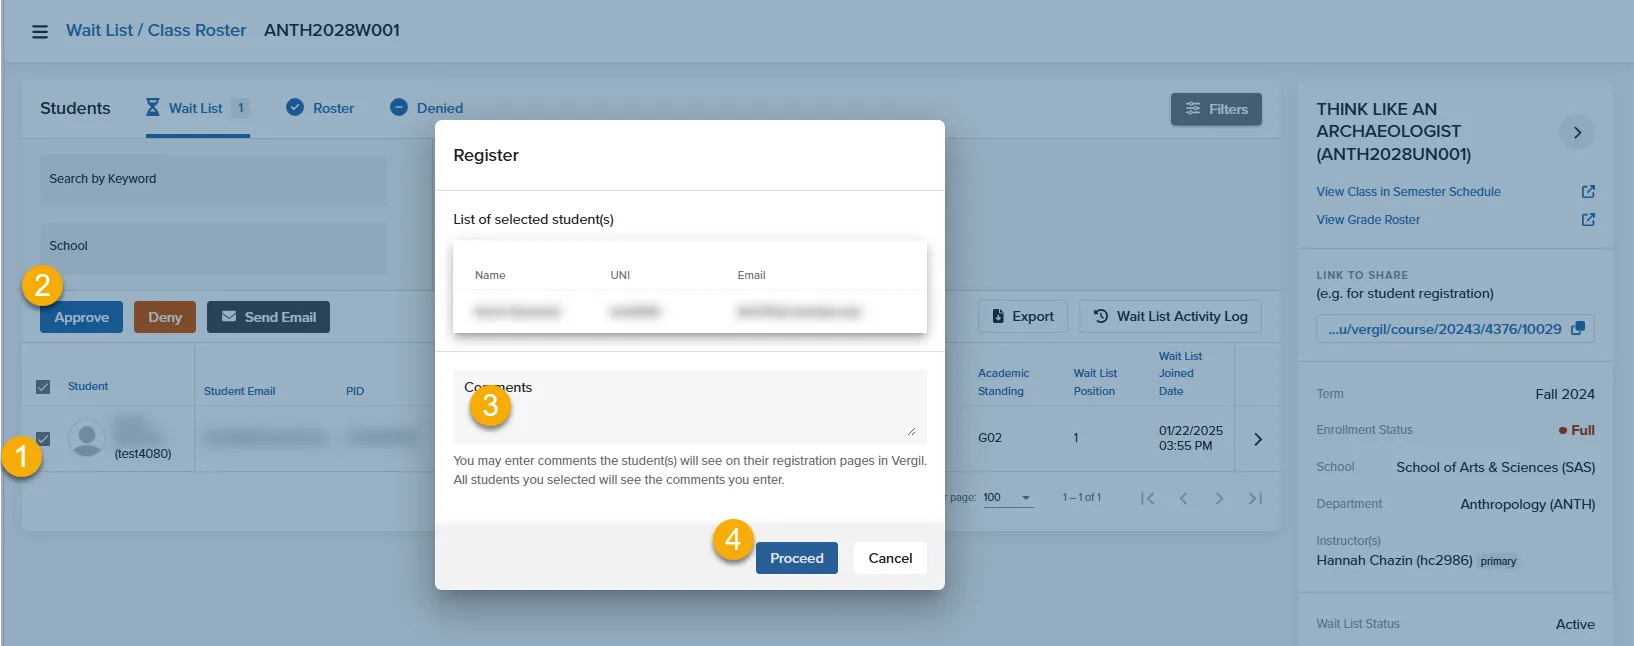
To Approve (or Deny) students from the Wait List, first select the student(s) you want to Add to your Course. Click Approve (or Deny). You will be prompted to add an optional reason for adding them and then need to do a final confirmation (see screenshot below).
Instructors can add up to 10 percent more students than set by the Enrollment Capacity to allow for student attrition.
Using an Instructor-Managed Wait List, you can require that Students submit additional material for your review when joining a Wait List. This could be in the form or written text, which can include URL links, and/or a file upload.
Supported file types: TXT, CSV, XLS, XLSX, DOC, DOCX, PDF, JPG, JPEG, PNG, HEIF, and HEVC
Supported file size: 2MB
The material submitted through the Wait List Application will be available within your Wait List.
To view the attachment submission: click on the paper clip icon to download the file to your device.
To view the text box submissions: click on the text bubble icon to open the Comments window. The Comments window contains the:
- Name of the Student
- Date of the comment submission
- Time of the comment submission
- Text entry response
Admin View of Wait List Application Submissions


Student View of Instructor Managed Wait List Application

The Export function on Wait Lists (and Rosters) allows you to download a .CSV file of students currently on the Wait List. The .CSV will include the visible columns on the Wait Lis.
Each wait list contains a Wait List Activity log and Export function.
The Wait List Activity Log contains a historical record of all actions taken in the wait list it is accessed in. It contains columns outlining the Wait List:
- Status: the action completed
- Name: the name and UNI of the Student(s) impacted
- Action By: the Uni and Name of the user who completed the action
- Action Date/Time: the Date and Time the action was completed
- Wait List Count Prior: the wait list count prior to the action's completion
- Wait List Count After: the wait list count after the action is processed
The Activity Log can be filtered and exported using the buttons above the list of records - highlighted in the image below.

The Export function allows you to download a .CSV file containing the waitlist columns and waitlisted students' information to your device at the click of a button.

Useful Links and Information
The Course Information Panel contains a few important links to:
Share a Class with a Student to Register or Plan out their schedules.
Students can use this link to view the class in Course Search to add it to their Planner or My Schedule/Registration
Access the Class in the Semester Schedule.
Clicking this link will open the Class in the Semester Schedule in Course Management. Edits made in Course Management will sync within a few minutes to the Course Roster.
View the Grade Roster.
This link directs Instructors to the Grade Roster, which is still in SSOL.
Please Note: Visibility of the links is based on permissions. E.g., only current Class Administrators will see the link to Course Management. Only Instructors will see the Grade Roster link.

Cancelling Courses
*Note that only class / schedule administrators will be able to Cancel Classes. This is not available to course instructors.
From the Course Roster, use the 'Cancel Class' button on the Class Information Panel. Students will be dropped from the Course and will receive an automatic email notification.
To send a custom message to students, use the Email Students functionality BEFORE canceling the Course.
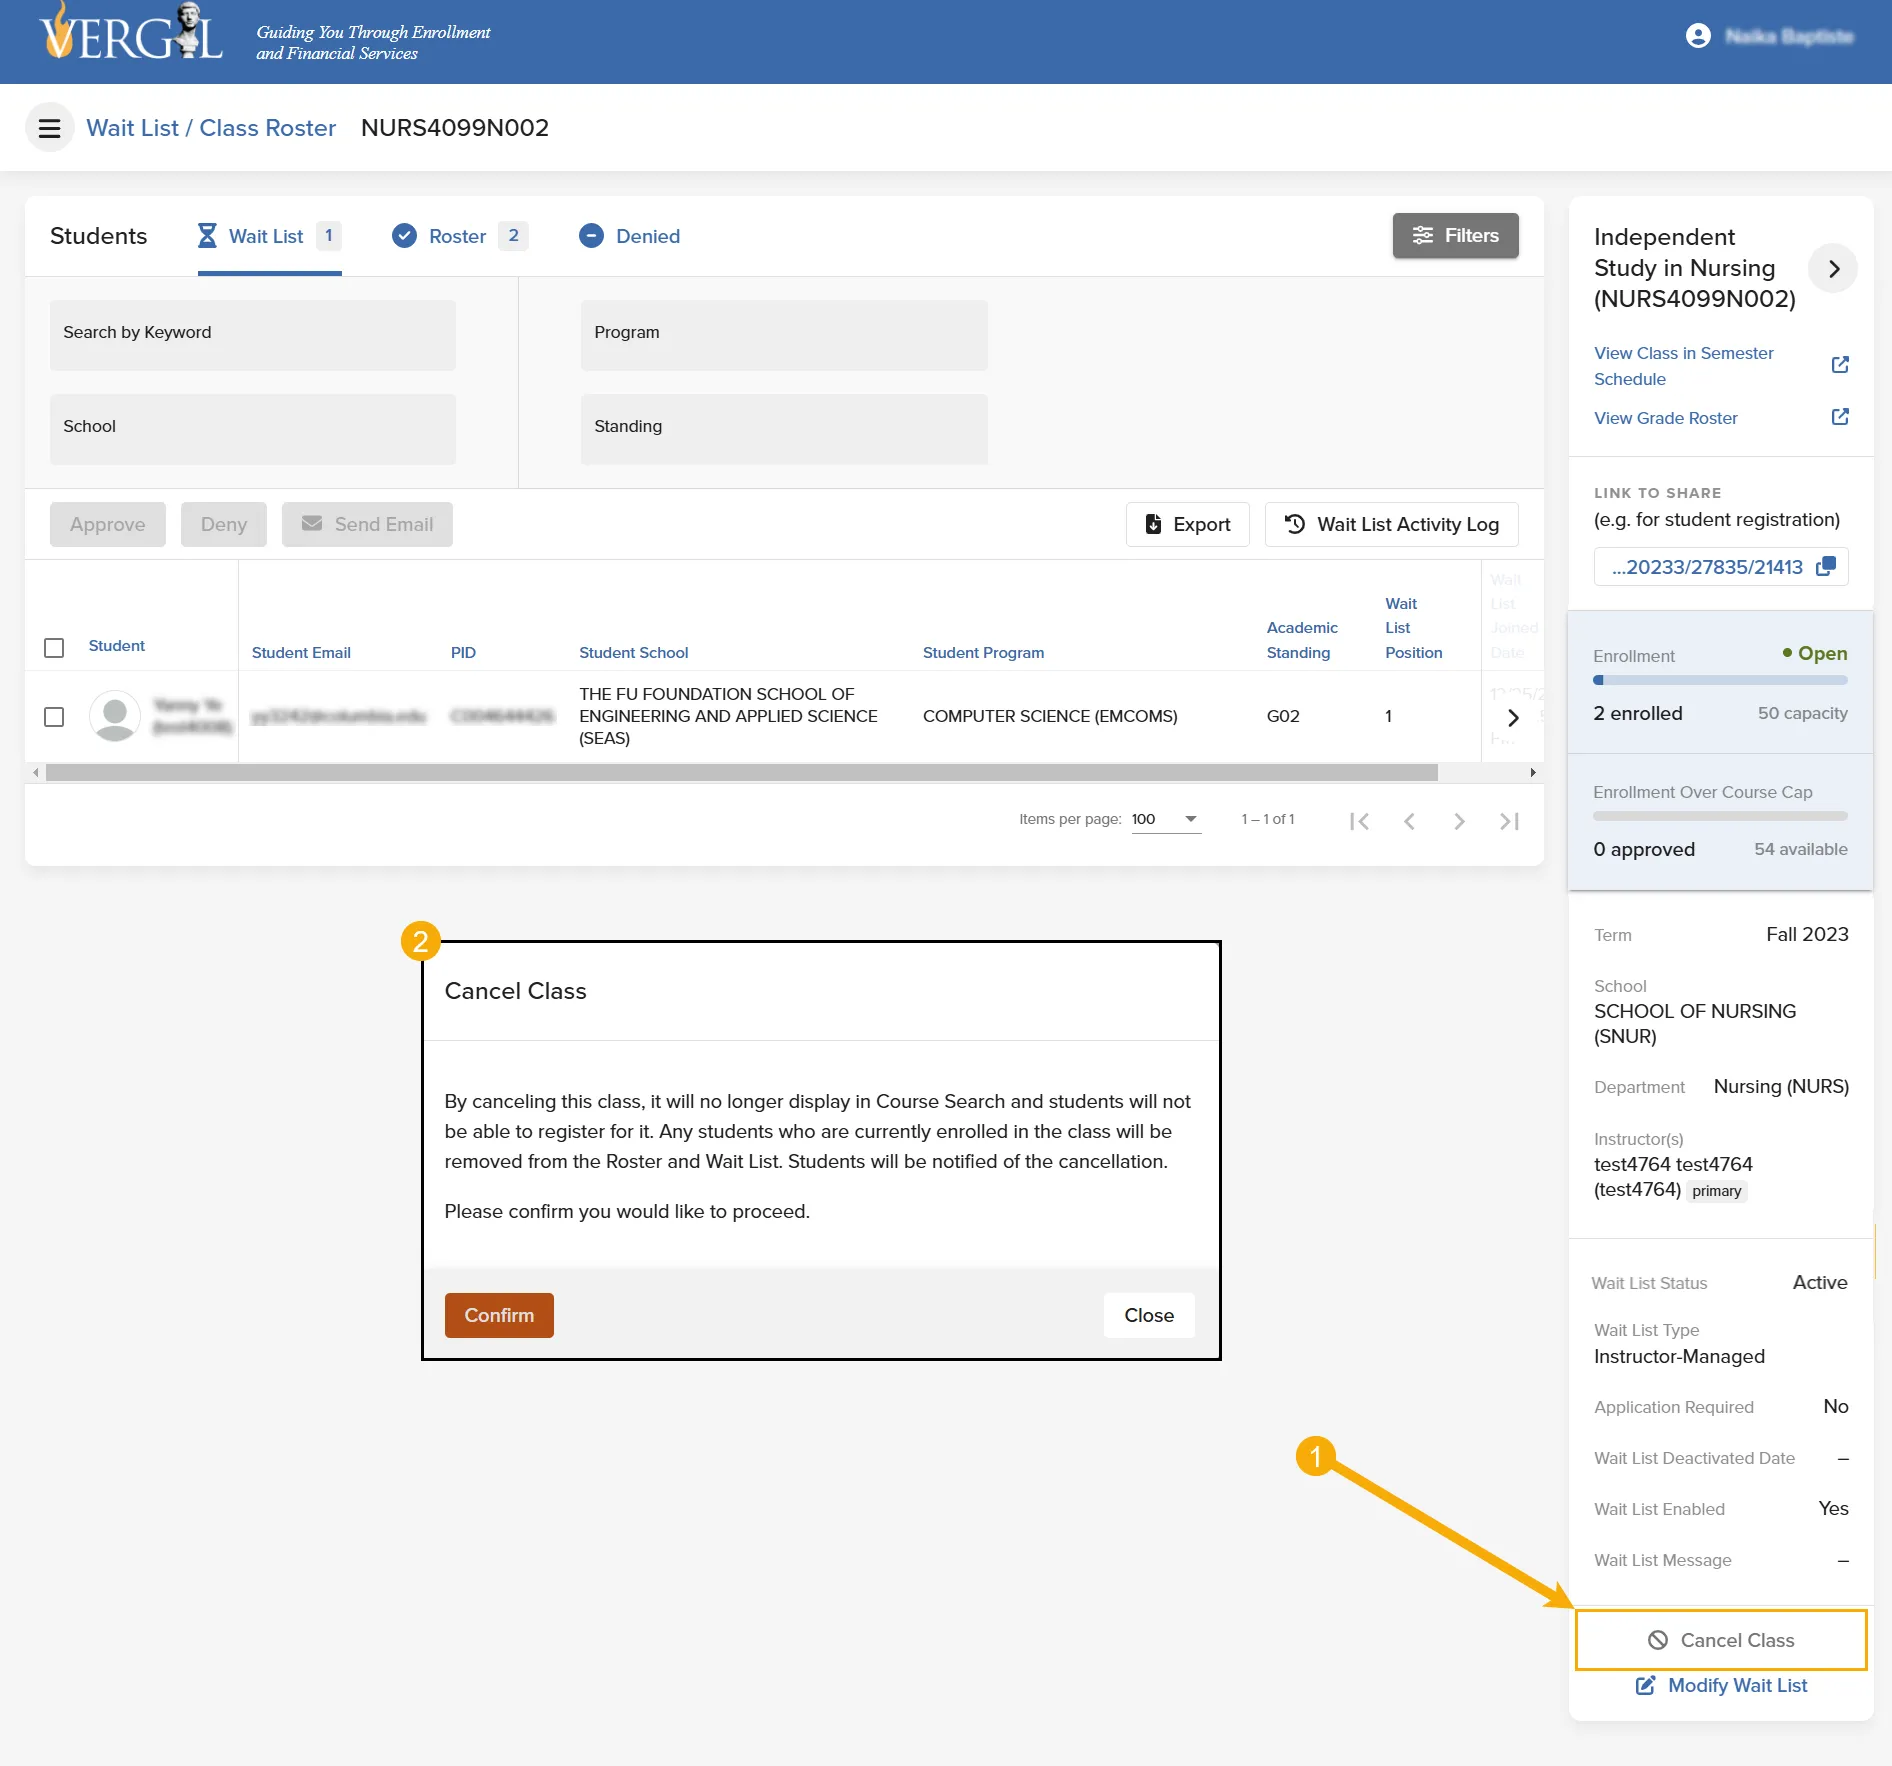
From the Course Roster, use the 'Cancel Class' button on the Class Information Panel (see above).
OR
In Course Management, set the Enrollment Status to 'Canceled